
Google Photos is an amazing cloud service with reasonable pricing and a large amount of free storage. However, because the “Unlimited” option has been deleted, you may have little room for new images. Your only options are to switch to another cloud provider, find your space capacity, or delete many photos, screenshots, videos, and produced images. Unfortunately, you cannot delete all images/videos in Google Photos with a single click. There is no option to “Select All.” Regardless, you may delete images and videos in bulk by using a keyboard and mouse combination. The method allows you to select everything, but it’s best to do it in smaller increments, such as 500. Regardless of how you manage the process, it is time-consuming, but more time-consuming than group-deleting images by date, especially if you’re over 2,000 photos to manage. Before you start deleting, you should take certain safeguards. This is how you do it!
How To Easily Protect Synced Google Photos Images From Accidental Deletion?
When you delete images or videos from Google Photos, the process deletes the identical ones from all synced devices, and vice versa. Here’s what you can do to avoid this predicament.
1 – Open the Google Photos app on an iPhone or Android device.
2 – Navigate to Photos, then Backup & Sync.
3 – Disable the Backup & Sync option.
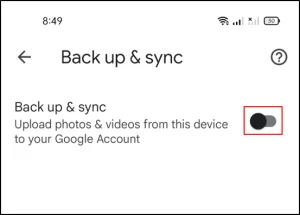
This option will un-sync your devices and allow you to free up cloud storage without deleting anything from your phone or tablet. It also works the opposite way around. To delete individual photos, open the photo in question and click the trash symbol in the top right corner. The images are moved to the Trash folder due to this action. To avoid any difficulties, we suggest using Google Chrome as your browser of choice while editing your Google Photos.
Note For Chromebook Users – Google Photos and Google Drive do longer sync as of 2019. Unfortunately, this means you won’t be able to access your Google Photos using the Google Drive shortcut on your Chromebook. Instead, you must use the browser to delete your pics and access photos.google.com.
How To Easily Delete All Google Photos Using Windows, Mac, Linux, And/Or Chromebook?
Whether you use Windows, Mac, Linux, or a Chromebook, deleting all your Google Photos from a PC is the same. Because you may accomplish it in any browser, the methods apply to every operating system. Although it is preferable to delete images in groups, you might delete all images/videos simultaneously. Deleting smaller groups of things minimizes unintentional circumstances in which you lose the selection line and have to start over.
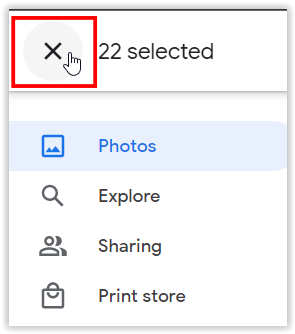
Note: If you get stuck while highlighting and deleting, shift-click on the last checked-off item and next shift-click again to reselect it. You may then continue scrolling and highlighting. You may also restart by clicking the “X” next to “[###] chosen” in the top-left area.
Here’s how to easily delete all Google Photos images from a Windows, Mac, Linux, or Chromebook computer.
1 – Sign in to Google Photos using your Google account credentials.

2 – Choose the “first image” by left-clicking it and ensuring it has a blue-circle checkmark.
3 – Scroll down the page until you reach multiple rows/images. Hold down the “Shift key” and left-click the final visible image (it should highlight in blue) to select everything in between; next, release the “Shift key.” Well, if it doesn’t highlight the items, scroll up a little and repeat.
4 – If you hit the maximum number of items in Step 3 but still have them checked off, now repeat the process until you have a sufficient number of things chosen. Google remembers your most recent action and adds to it as you go.
5 – Your ability to select all images depends on your system and your Google Photos profile data. We got 400-500 chosen images/videos in one session and all of them (1800+) in the next. If everything is highlighted in blue, left-click to select them. Otherwise, smaller steps will be required (Steps 3-4).
6 – Optional: Hold the “Shift key” on the first image; move the mouse/trackpad cursor over/across others. Unfortunately, you can only scroll down once you click the left mouse button to choose all highlighted objects. This process takes time.
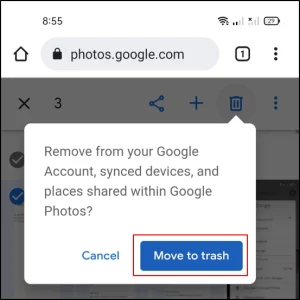
7 – Once you’ve checked off all or a big collection of images/videos, click the “trash can icon,” then choose “Move to Trash” to delete the checked/highlighted objects.
The solution to selecting a larger number of images is to scroll down in increasingly substantial chunks until it doesn’t highlight the final image on the screen when you press the “Shift” key. Next, scroll up and repeat hitting the “Shift key” until it happens. Next, you hold “Shift” and left-click to select them, then repeat the process until you have selected everything or a large chunk of images. In addition, each image must have loaded (at least partially) on the screen for Google Photos to allow you to highlight objects. You can now speed scroll down to 100 or leisurely scroll and confirm image loads to reach 2,000 or more. You can scroll down to the bottom if you have a quicker connection and a faster device. Following that, you may delete them. The process is based entirely on trial and error.
How To Easily Delete All Google Photos From An Android Device?
On mobile devices, selecting all of your photos to delete them takes time, especially if you have a huge collection. Because tablets and smartphones lack a bulk-delete or “Select All” option, you must select each image manually, although you may at least choose the days to select in groups. Here’s how you can do it.
1 – On your smartphone, open the “Google Photos” app.
2 – Select the “menu icon” (three dots in the upper-right tap), not the browser’s top-most menu icon.
3 – Select “Select photos.”
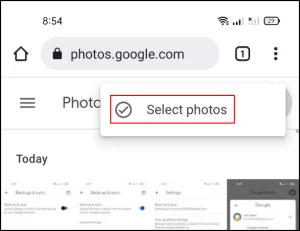
4 – Choose the photos you wish to delete and/or the day to mark them.
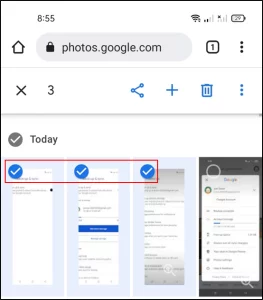
5 – To confirm the deletion, tap “Move to trash.”
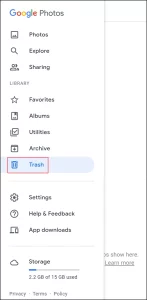
6 – To permanently delete an item, return to the “Menu” and select “Trash.”
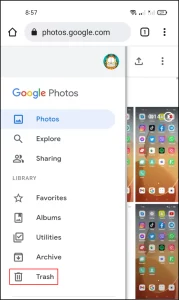
7 – Select the “Trash” icon.
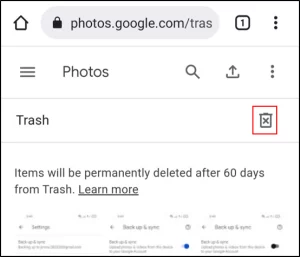
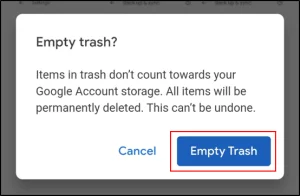
8 – To confirm, choose the “Empty Trash” option.
How To Easily Delete All Google Photos From An iPhone?
The reason why so many iPhone owners use Google Photos is simple. Google Photos has a larger free storage capacity than iCloud. At the same time, upgrading is also less expensive using Google’s storage. Follow these instructions if you wish to free up space in your Google Photos and have an iPhone.
1 – Open the app on your iPhone.
2 – Tap the Free Up Space button, which is found beneath the Trash folder. This will delete all of your photos.

Alternatively, you may manually select all of the photos in your collection. Then, to delete the photos, tap the trash can symbol.
Although this frees up space, remember that your photos may still be restored from the Trash folder. As a result, iPhone users may face some difficulties. For instance, deleting photos from the Google Photos app may also delete them from your iCloud storage. You should receive a message asking if you agree with the action.
FAQs:
How To Easily Undelete Google Photos?
Well, you should be familiar with the Recycle Bin if you use a PC. When you delete anything, it does not just vanish. Many files and photos are discarded. This system is useful since it allows you to free up some storage space and recover your files afterward. You may go into the trash folder and access all or portion of your photos. However, remember that the 60-day grace period applies per picture, not per folder, and is based on the individual deletion date and time. Tap the Restore button after selecting an image to recover. Alternatively, if you want to bypass the counter and erase the pic straight away, tap the Delete option.
Is Your Google Photos Permanently Deleted After Deleting?
Deleted Google Photos are discarded. You cannot, however, leave them there permanently. There’s a default grace time before you permanently lose your photos. Google Photos stores deleted photos for 60 days in the trash. They are gone after 60 days. Indeed, each picture has a 60-day recovery time after placing it in the trash folder. Using the new indication system is advisable to determine how much time you have to recover each picture. You will be unable to recover those photos after 60 days. This is especially true if you sync all of your devices. If you don’t sync your devices, deleting anything on Google Photos will not lose in the loss of the pic from the device used to capture the photos.
Conclusion:
Unless you are okay with decreasing image quality, your Google Photos storage will eventually run out. You may have to face the truth that a storage increase is required sooner or later. However, despite Google’s affordable rates, only some will want to spend money on it. The excellent news is that you can easily always delete some of your older or less-than-perfect photos. If necessary, you may delete all of your photos with a few clicks. You may even delete them permanently if you want. Could the process be simplified now that you know how to easily free up Google Photos storage space? Please let us know whether you find Google Photos useful or prefer alternative cloud storage options. Also, please let us know if you have any unexpected problems with the device syncing or if photos are missing.