
Error Code 0x80070490 is a typical error one might encounter when attempting to update Windows. Corrupted files in the component-based servicing and system component store generate this error. These two services are in charge of running all Windows update processes. If you get error code 0x80070490 in Windows 10 or 11, it was most likely caused by corrupted files in the system component store and component-based maintenance. These are not the only reasons you may face this error. This error can be caused by incompatible third-party antivirus, viruses on your computer, and corrupted registry files. This is a typical error that many Windows 10 and Windows 11 users have reported facing.
How To Fix The Windows Update Error Code 0x80070490?
If you are facing this issue, this article will solve you in resolving it. Then, we’ll go through some troubleshooting steps for error code 0x80070490 in Windows 10 and Windows 11.
1. Scan PC For Viruses

Viruses might cause this error. This issue might be caused by viruses or malware on your computer. If you face this issue, you should check your computer for viruses. You should use Windows Defender to scan your computer for viruses and remove them. If you use a third-party antivirus on your computer, you should scan it. Using the antivirus, scan your computer for viruses. Remove or quarantine any viruses from your system and restart it. After that, restart your computer to see whether the problem has been resolved.
2. Disable Antivirus

Third-party antivirus may clash with your system, and you may face this issue. You will likely face this error if you have any third-party antivirus software installed on your computer. Disable any third-party antivirus software on your PC before updating it. This should solve the error code 0x80070490 in Windows 10 and Windows 11. Well, if you continue to receive this error, you may try removing the antivirus. Next, uninstall your antivirus software and restart your computer. Try updating your computer again, and you will not face this error.
3. Run SFC Scan
If corrupted files on your system cause this error, you should run an SFC scan. SFC, or System File Checker, analyses your computer for corrupted files and repairs any that it finds. Well, follow the steps below to run SFC Scan.
1 – Search for the command prompt in the start menu and right-click on it. Now click Run as administrator. This will launch the command prompt as an administrator and provide it full administrative privileges.
2 – In the command prompt, type SFC /scannow and press enter to execute it.
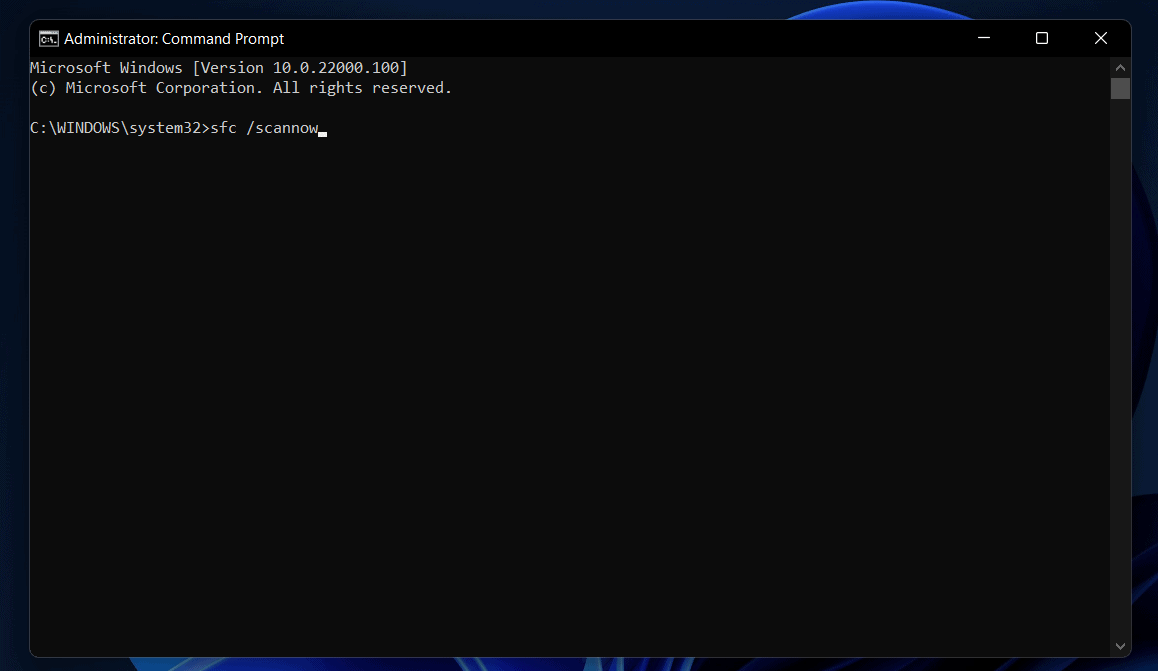
3 – Your system will be examined for corrupted files, and any corrupted files found will be repaired.
4 – Restart your computer, and the problem should be resolved.
4. Run DISM
Another option for troubleshooting is to run a DISM scan. If the SFC scan does not fix the error, you should try running a DISM scan on your computer. Well, follow the steps below to run a DISM scan.
1 – Run a command prompt as administrator.
2 – In the command prompt, type DISM.exe /Online /Cleanup-image /Restorehealth and press Enter to execute it.
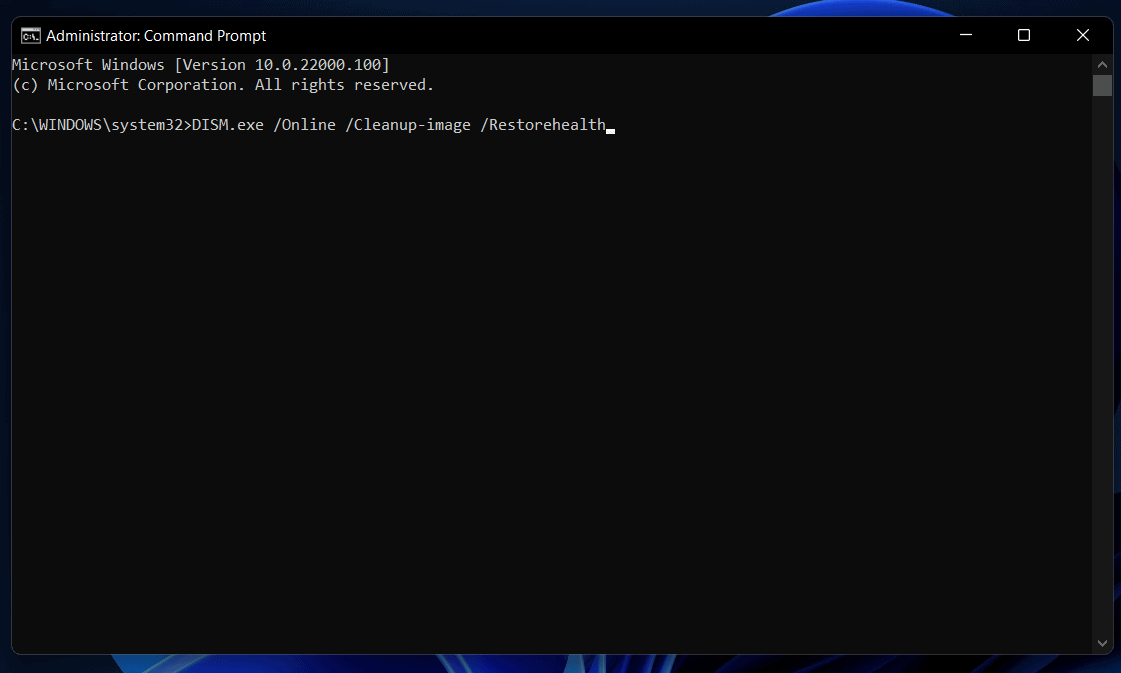
3 – This will fix all of the errors. If DISM did not find any files online, you should insert the installation media drive into your PC.
4 – To execute the command, type DISM.exe /Online /Cleanup-Image /restorehealth /Source:C:RepairSourceWindows /LimitAccess and press enter. Ensure sure to change C:RepairSourceWindows with the installation media’s path.
5 – Once completed, restart your PC, and you will no longer face the issue while attempting to update Windows.
5. Run The Update Troubleshooter
If you continue receiving error code 0x80070490 with Windows 10 or 11, try running the update troubleshooter. A troubleshooter is a tool in Windows that can assist you in troubleshooting problems on your computer.
1 – First, search for troubleshooter settings in the start menu and open it.
2 – This will open the troubleshooter. The Windows Update option may be found here. If it is not accessible, go to Other Troubleshooters and look for Windows Update.
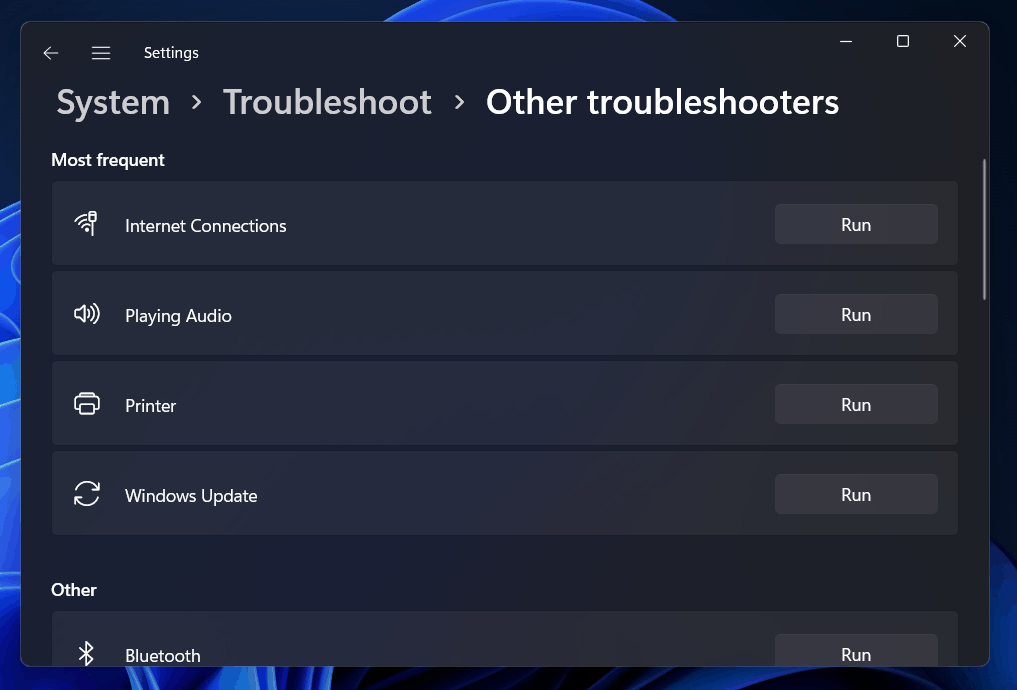
3 – Choose Windows Update and press the Run button to launch the Windows update troubleshooter. Follow the on-screen directions provided by the troubleshooter.
This will find and fix the issue with the Windows update.
6. Ensure To See If Certain Services Are Running
Well, if you continue to see this error, check to see if the BITS, Windows Installer, Windows Update, and Cryptographic services are running. If they are not running, you must manually start them.
1 – Press the Windows + R key combination to open the run dialogue box.
2 – In the run dialogue box, type services.msc and press OK.
3 – This will open up the Service window. Search for Windows Update, MSI Installer, BITS, and Cryptographic services here.
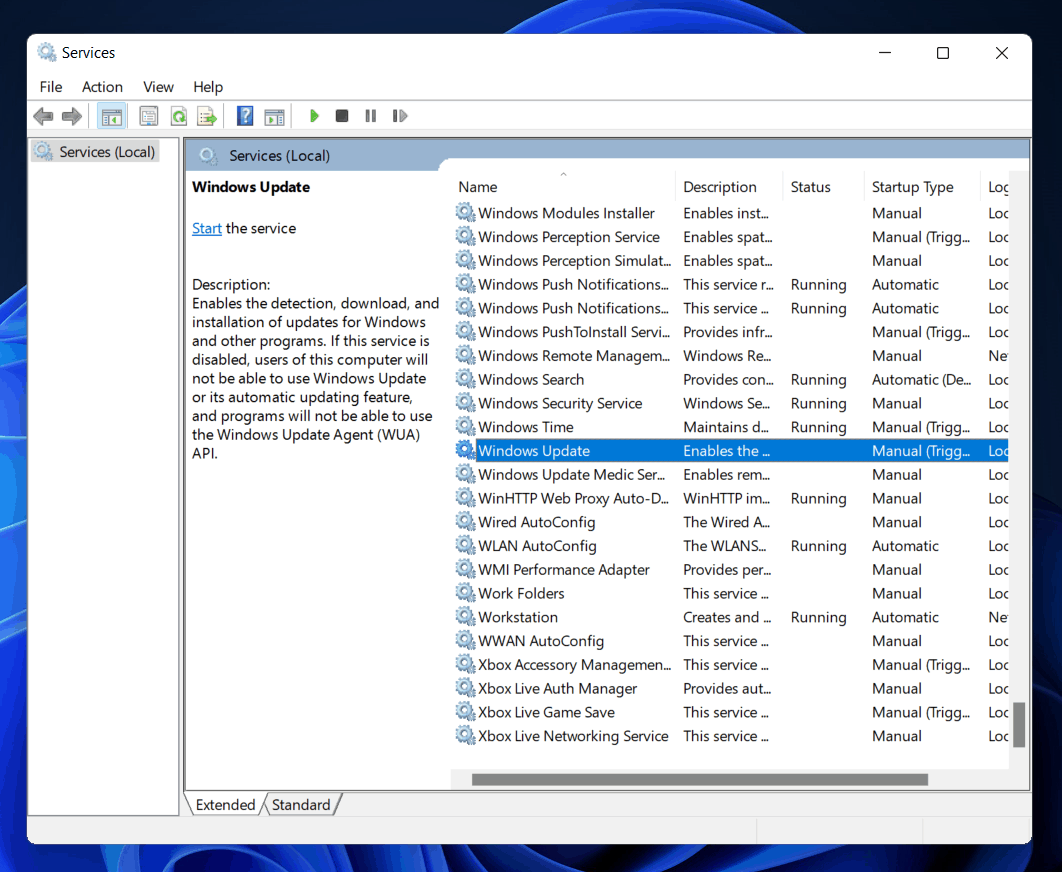
4 – Determine whether or not these services are operational. Under the stats page, you can see if these services are running or not.
5 – If these services are not running, double-click on them, select Start, and then click OK. Start the service on your own.
6 – After that, try updating Windows again, and the error 0x80070490 should be gone.
7. Delete The SoftwareDistribution Folder
You may try removing the SoftwareDistribution folder as a final resort. However, you must disable the Windows Update service before you do so. Follow the steps below to disable the Windows Update service.
1 – Press the Windows + R key combination to open the Run dialogue box. Search for services.msc in the run dialogue box and click OK.
2 – Search for Windows Update in the Services panel. Right-click Windows Update and choose Properties.
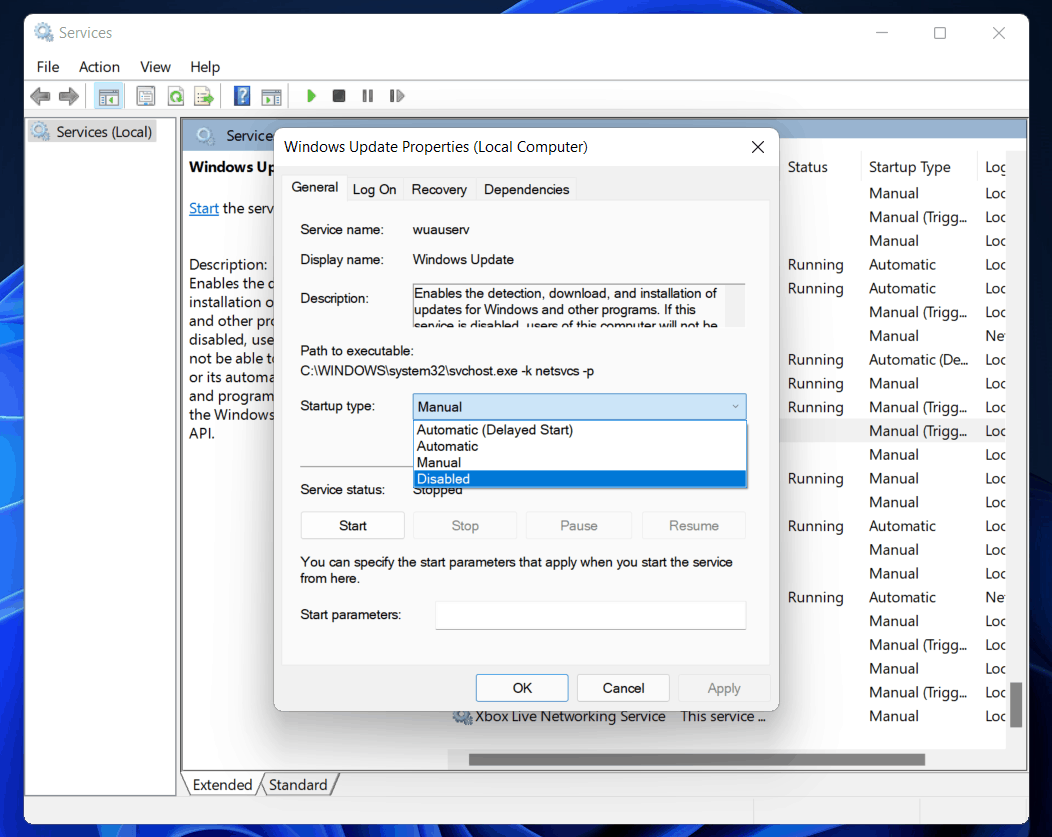
3 – In the properties window, set the starting type to disabled.
4 – After that, restart your computer.
After you have disabled Windows Update, you must delete the SoftwareDistribution folder. To do so, follow the steps outlined down:
1 – Launch File Explorer on your PC and navigate to Local Disk C.
2 – Open the Windows folder. Search for the SoftwareDistribution folder in the Windows folder.
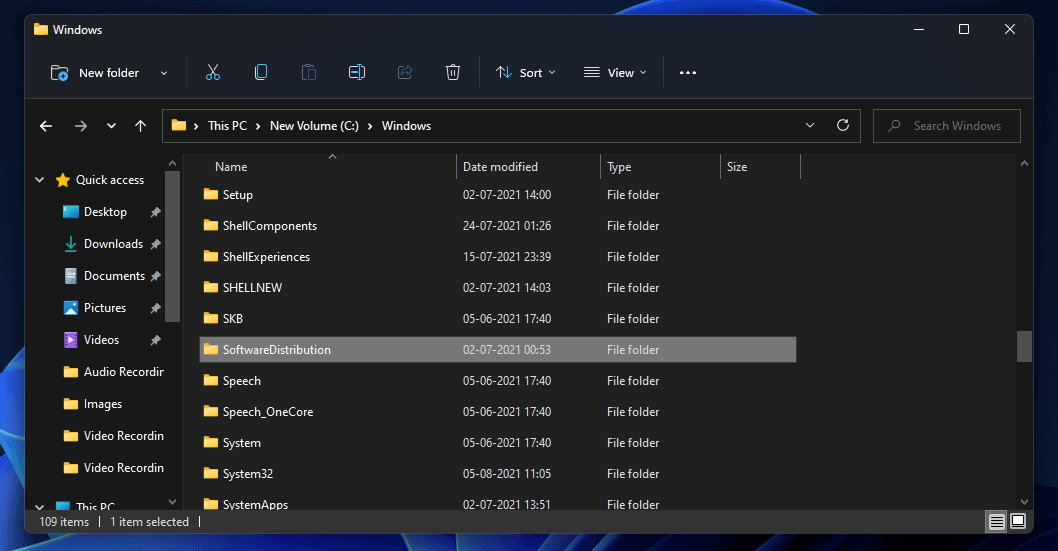
3 – Right-click this folder and rename it SoftwareDistribution.OLD. You may delete it or keep it by just altering its name.
4 – Once finished, restart your computer.
You must then re-enable the Windows Update service. To do so, follow the steps below:
1 – Return to the Services window as previously.
2 – Search for the Windows Update service. Right-click it and then click Properties.
3 – Type from disabled to manual starting.
4 – Restart the computer and then check for Windows updates again.
In Windows 10 and Windows 11, you will no longer face the Error Code 0x80070490.
Also Check :
Final Words:
If you receive the error code 0x80070490 on Windows 10 or Windows 11, follow the steps in this article to fix it. These were some of the steps to resolving the 0x80070490 error. We hope that this article helps you with the problem you were having.