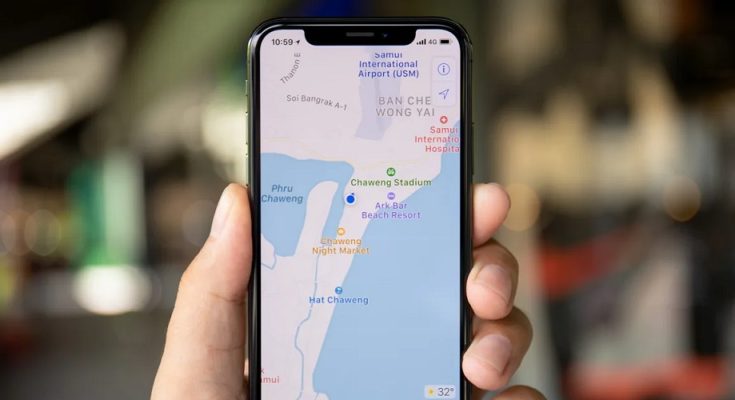
You’ll start at your home address when using Apple Maps. The app uses the address in your contact card to determine your home address. But what if you change your mind? The app can detect your location but will not know if your home address has changed. It will continue to use your prior address as your primary address. As a result, you’ll need to update the information on your contact card. Continue reading to find out how to change your home address in Apple Maps for more accurate directions.
How To Easily Change Home Address In Apple Maps On iPhone?
You may edit your contact card directly from Contacts or access it via the Maps app to make the change. To change it using Contacts, follow these steps:
1 – Launch the Phone app.
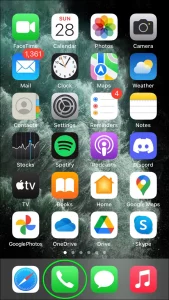
2 – Select Contacts at the bottom of the screen.
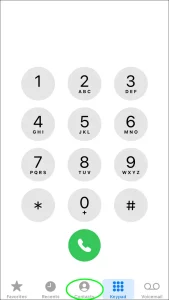
3 – At the top, select your contact card.
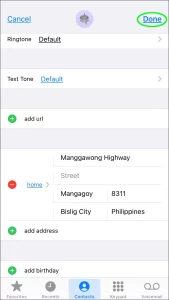
4 – Press Edit from the top-right menu.
5 – Select Add address to add your new information. Alternatively, press the minus – sign next to your home address, followed by Delete, to delete it and start.

6 – When you’re finished, click Done.
If you’ve Maps open, you may find your contact card by typing:
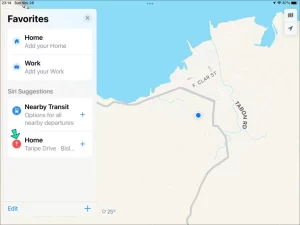
1 – In the Maps, slide to the Favorites area; then press See All.
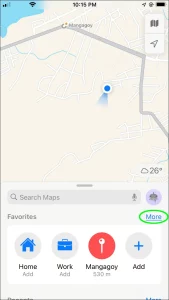
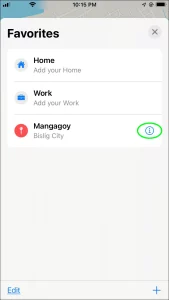
2 – Choose the Info (i) icon next to Home.
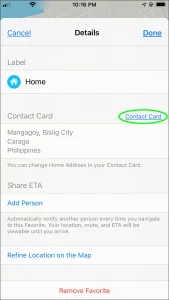
3 – Select Contact Card from the drop-down menu above your address.
4 – Follow steps 4-6 above to change your home address.
How To Easily Change Home Address In Apple Maps On iPad?
You may update your home address via the Contacts app, much as on the iPhone, or access your contact card via Maps. Here are the steps to change your home address in Contacts:
1 – Launch the Phone app.
2 – At the bottom of your screen, select Contacts.
3 – At the top, choose your contact card.
4 – Select Edit in the top-right corner.
5 – Enter Add address to add your new address. To start, touch the minus (-) mark next to your home address and press Delete.
6 – When you’re completed, press Done.
If you happen to be in Maps, follow these steps to find your contact card:
1 – Swipe up to see Favorites, then tap See All.
2 – Next to Home, press the Info (i) icon.
3 – Tap the Contact Card button above the address.
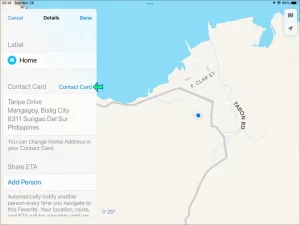
4 – To change your address, repeat steps 4-6.
How To Easily Change Home Address In Apple Maps On Mac?
The steps for changing your home address on a Mac are identical to those for the iPhone and iPad. The simplest method is through Contacts; however, you may also access your contact card using Maps. Here’s how to update your address information in Contacts:
1 – From the dock, open the Contacts app.
2 – Click your card and then click Edit.
3 – Choose Home towards the bottom to add your new address.
4 – Click Done to save your new address.
To access your contact card via the Maps app, follow these steps:
1 – Choose the arrow beside the search box at the top of Show Your Current Location.
2 – Select the Info (i) icon next to Home on the map.
3 – Select View Contact from the drop-down menu above your address.
4 – Repeat steps 2-4 to update your home information.
FAQs:
How To Easily Save Locations On Apple Maps?
You may save regularly visited locations, such as your Home, business, or a friend’s house, to your favorites list in Maps. To add a location to your favorites on your iOS device, follow these steps:
1 – Launch the Maps app.
2 – Under Favorites, tap the plus (+) sign to add an address.
3 – Begin entering the new address; if the whole address is shown, press it. The updated address will be displayed on a contact card.
4 – Verify that the details are correct, then select the location type under Type.
5 – When you’re happy with the details, tap Done in the upper-right corner. Your favorites will be updated with the new location.
Well, to share your ETA from your iOS device, follow these steps:
1 – Launch the Maps app and select your destination.
2 – Choose Directions and your mode of transportation, and then Go.
3 – After the trip has begun, the Share ETA button may appear at the bottom of the screen.
4 – Press the footer indicating the arrival time, then Share ETA.
5 – Next, either select one of the contacts iOS believes you’ll want to share with or tap Contacts.
6 – Once you’ve chosen the individual, your ETA will be given to them.
Conclusion:
Apple Maps provides simple directions and projected arrival times to the locations you need to visit. It uses your contact card’s home address as your home starting point. Well, if your home address has changed, Maps will not detect it automatically. As a result, you may notify Maps that you’ve relocated by updating your contact card’s home address. Has Apple Maps always given you accurate directions? Has it ever taken you to the wrong location? Share your experience in the comments area below.