
If you’re new to iOS, you may seek ways to accomplish fundamental tasks on your iPhone. You should learn how to change the brightness of your iPhone screen and automatically adjust the brightness of your display, change color tones using True Tone and Night Shift, and other display-related settings. In this post, we’ll show you how to change the brightness of your iPhone’s display and other relevant settings that need to be adjusted.
How To Easily Change Brightness On iPhone From Control Center?
The Control Center on iOS is the simplest way to adjust the display brightness on your iPhone. You can do so by doing the following steps:
On An iPhone With Face ID – Slide down from the top right corner of the screen.
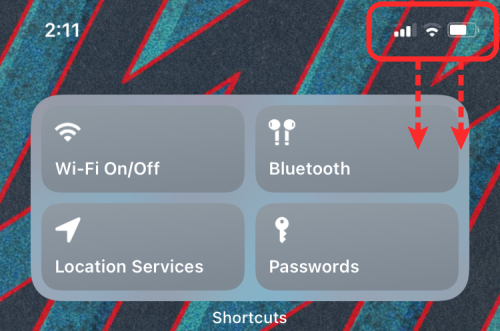
On An iPhone With A Home Button – Slide up from the bottom edge of the screen.
When the Control Center is open, the Brightness slider is to the left of the volume slider. Touch and drag the slider upwards and downwards to increase and decrease the brightness of the light emanating from your iPhone’s screen.
Touch and hold on to this Brightness slider to fine-adjust the brightness settings. It should expand the brightness slider to a broader vertical bar. You may now drag your finger upwards and down as desired.
How To Easily Change Brightness On iPhone From Settings?
You may change the brightness of your iPhone directly from its settings, in addition to adjusting it through the Control Center.
1 – To do so, open the Settings app and navigate to Display & Brightness.
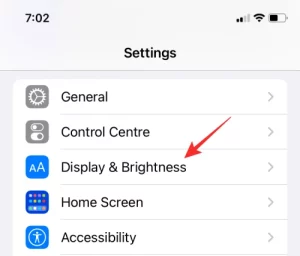
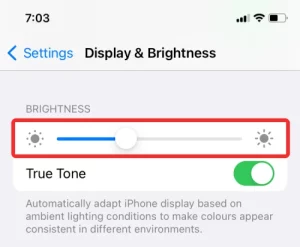
2 – Inside Display & Brightness, look for the “Brightness” section, which should have a display slider under it. Drag this slider to the left or right to lower or increase the light emanating from your screen.
How To Easily Toggle Auto-Brightness?
If you don’t want to change the brightness of your iPhone manually and instead want iOS to do it for you, you may use your device’s ambient light sensor. All recent iPhones include ambient light sensors, which detect ambient light conditions and adjust brightness settings accordingly. To prevent manually changing brightness settings, toggle this setting.
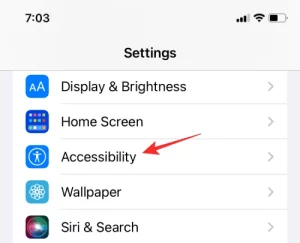
1 – Toggle Auto-Brightness on iOS by launching the Settings app and navigating to Accessibility.
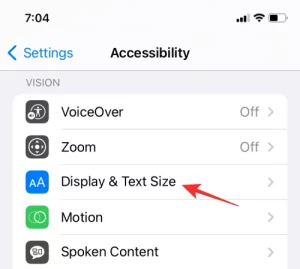
2 – Inside Accessibility, choose Display & Text Size.
3 – On the following screen, scroll down and enable the Auto-Brightness toggle to have iOS adjust the brightness settings based on your surroundings.
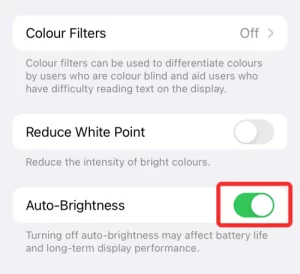
When auto-brightness is enabled, the Brightness sliders in the Control Center and Settings app will change on their own based on the room’s lighting conditions without your intervention. When you enable this setting, your iPhone will lower the display brightness when you’re in a dark place and increase it when you’re outside or in direct sunshine.
How To Easily Change Display Color With True Tone?
Modern iPhones include a sophisticated sensor that adapts the hue and intensity of the display to your surroundings. In addition, iPhones with multi-channel sensors can assess the brightness of ambient light and detect its color. With this information, iOS will adjust your iPhone’s display by adjusting the white balance to seem more natural and lessen eye strain. Unfortunately, True Tone does not work on all iPhones. However, you may enable it on the iPhone 8 and all subsequent models.
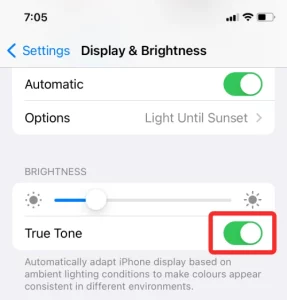
1 – To toggle True Tone on your iPhone, go to the Settings app and navigate to Display & Brightness.
2 – Inside Display & Brightness, toggle the True Tone toggle to enable your iPhone to change the color tone of your display dynamically.
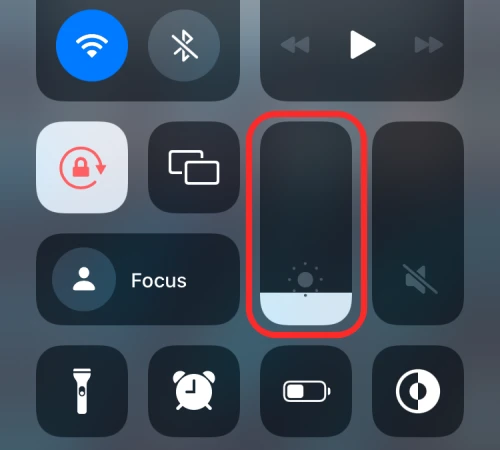
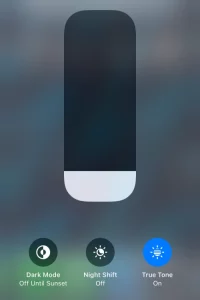
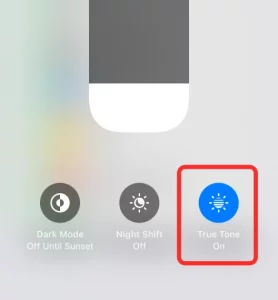
3 – You may also enable True Tone from the Control Center. Launch Control Center on your iPhone and tap and hold the Brightness slider within.
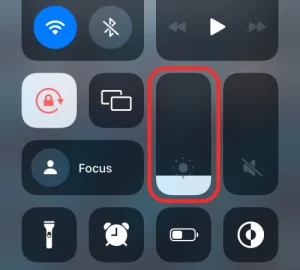
4 – This will expand the view of the chosen control. Tap the True Tone button at the bottom of the enlarged Brightness control to turn it on your iPhone.
How To Easily Toggle Dark Mode?
Aside from changing the brightness of your display, if you want to minimize eye strain from your iPhone, you may enable the native Dark Mode under iOS. This enables you to use your iPhone in dark conditions, such as at night, without disturbing your companion or lighting up the entire space around you. If you want to minimize the brightness of your display’s backlight, choosing Dark mode might be a godsend because it only shows the UI components, while the background inside settings and apps is black or dark grey.
Enable Dark Mode Inside Settings
1 – Toggle on Dark mode by launching the Settings app and navigating to Display & Brightness.
2 – On the next screen, under ‘Appearance,’ select Dark.
3 – By turning on the Automatic toggle within ‘Appearance,’ you may also have iOS toggle Dark mode automatically throughout the evening or at your chosen time.
4 – Enable the Automatic toggle; a new section should appear below. Choose when you want Dark mode to be active by tapping on this Options section.
5 – On the following screen, choose Sunset to Sunrise if you want your iPhone to go into dark mode automatically in the evening.
6 – To enable this option at a certain time, choose Custom Schedule and set a time in the Light and Dark sections.
Enable Dark Mode Inside Control Center’s Brightness Slider
If you find it difficult to toggle Dark mode via Settings, there is an easier alternative – use the Control Center.
1 – Launch the Control Center and press and hold on to the Brightness slider to gain more options.
2 – When the Brightness slider is fully expanded, tap on the Dark Mode option at the bottom to enable it.
Enable Dark Mode Using Control Center Shortcut
A far faster method to accomplish this is to add a Dark mode control straight to the Control Center.
1 – Launch the Settings app and navigate Control Center to add one.
2 – In Control Center, tap the green ‘+’ symbol to the left of the Dark Mode option under ‘More Controls.’
3 – After you add the Dark mode control, you should see it appear inside the Control Center when you slide down from the top right corner of the screen (or slide up if you’re using an iPhone with a home button). Then, please tap on the Dark Mode control from this screen to enable it on your iPhone.
How To Easily Turn On Night Shift?
Night Shift is another option to change the color tone of your iPhone’s display. While True Tone changes the colors of your display somewhat depending on the lighting conditions around you, Night Shift changes the temperature of your display based on your location and the current hour.
The main goal of Night Shift is to prevent blue light from your iPhone’s display from disrupting your circadian cycles and making it difficult for you to fall asleep. By using warmer colors, your phone’s screen will show more yellow and less blue, allowing you to sleep better.
When you enable Night Shift, your display will default to its usual color tone or the one True Tone selects. However, when it’s time for sunset, Night Shift will change the colors of your display to warmer tones, making it easier for your eyes to use as the sun sets.
1 – Launch the Settings app and navigate Display & Brightness to enable Night Shift.
2 – Inside Display & Brightness, choose Night Shift.
3 – Toggle the Scheduled option on the following screen.
4 – Look for the “From – To” section underneath it. Tap on this section to select when the Night Shift should be activated. If you want to experience Night Shift for a short time, you may use the Manually Enable Until Tomorrow toggle instead.
5 – Toggle Night Shift instantaneously by launching the Control Center on your iPhone and pressing and holding the Brightness slider within it.
6 – When the Brightness control extends to a bigger view, tap the Night Shift option at the bottom to enable or turn it.
How To Easily Change Night Shift Color Temperature?
Night Shift and True Tone are tools for adjusting your display’s color temperature, but they function differently than we discussed above. While True Tone uses your iPhone’s Ambient sensor to detect lighting conditions and dynamically change the display tones, Night Shift merely applies the warm color tone you select from sunset to daybreak. When Night Shift is activated, you may still pick how warm the hue of your display should be.
1 – To do so, open the Settings app and navigate to Display & Brightness.
2 – Inside Display & Brightness, choose Night Shift.
3 – With Night Shift turned on, drag the Color Temperature slider to the left or right, depending on how warm you want the screen color.
When you drag the slider to the right or select “More Warm,” your iPhone’s display will show yellow and less blue. This may impact the look and motion of subjects on the screen. Set the slider to the midway position for a better experience.
How To Easily Reduce White Point?
Even the lowest brightness level on the iPhone may be too uncomfortable to look at throughout the night. While features such as Dark mode, True Tone, and Night Shift exist to alleviate eye strain, none of these change the brightness of your iPhone.
If you believe your display is still too bright, you may enable an iOS option called “Reduce White Point” to decrease the iPhone backlight to settings lower than the brightness slider on your display. The setting adds a layer of black filter on top of your screen to make the display darker. Using this option, you may lessen eye strain and prevent long-term harm to your eyes from being exposed to your display’s bright lighting.
Enable Reduce White Point
On iOS, you may lower the white point by going to the Accessibility settings on your iPhone.
1 – To enable this option, launch the Settings app and navigate to Accessibility.
2 – Inside Accessibility, choose Display & Text Size.
3 – On the following screen, scroll down and enable the Reduce White Point toggle.
4 – When you enable this toggle, drag the slider below this option to select the appropriate intensity level.
To fine-tune this, we recommend decreasing your display’s standard brightness slider in Control Center to its lowest setting and selecting the appropriate dimness intensity level.
Once configured, you may toggle Reduce White Point from Settings > Accessibility > Display & Text Size whenever you want to enable it. Fortunately, there is an easier method to reach this option – through your Control Center.
Use Reduce White Point From Control Center
By opening the Settings app and selecting Control Center, you can add the Reduce White Point option to the Control Center.
1 – Scroll down this screen and touch on the green ‘+’ symbol next to Accessibility Shortcuts in the ‘More Controls’ section.
2 – Now that Accessibility Shortcuts is in the Control Center, you must add the Reduce White Point control to these shortcuts. Navigate to Settings > Accessibility > Accessibility Shortcut to accomplish this.
3 – Choose the Reduce White Point option until a checkmark appears to the left of it.
4 – After that, you can quickly enable or disable Reduce White Point by launching Control Center and tapping on the Accessibility Shortcuts control on the screen.
5 – Now, on your iPhone, toggle the Reduce White Point function on/off to dim/brighten the display.
How To Easily Increase Contrast?
If the text and options on certain screens don’t show as clearly as others, you may increase this by increasing the contrast on iOS. To increase the contrast on your iPhone, go to the Settings app and select Accessibility.
1 – Choose Display & Text Size from the Accessibility menu.
2 – On the following screen, toggle the Increase Contrast turn on.
3 – This should increase the color contrast between an app’s foreground and background colors.
That’s all there is to change the brightness of your iPhone’s display.