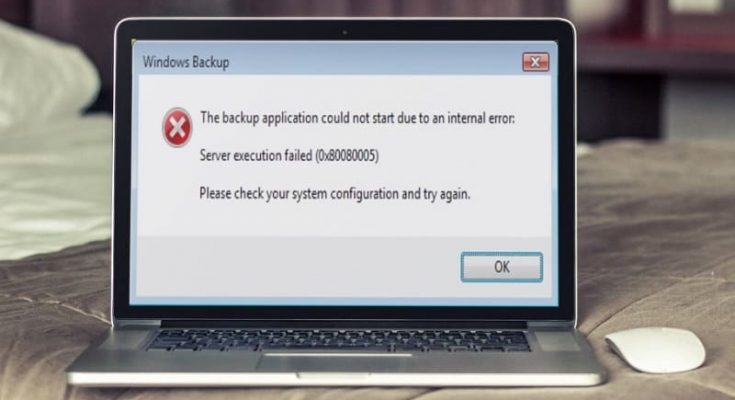
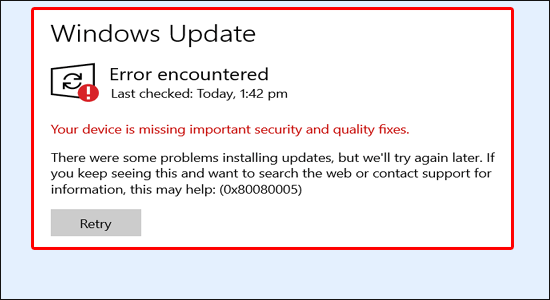
Updating the Windows system is required to make it more reliable and secure. However, the process is not always easy, as users experience numerous errors throughout the update, and the update becomes stuck between error codes such as 0xc1900104, 0x80070422, and Others. In addition, the error code 0x80080005 is another Windows update error that comes when Windows fails to download or install the update. Still, in some circumstances, users receive the error when looking for the latest update and see the error message on their screen:
So, we’ve compiled a list of tried-and-true solutions that have helped multiple users solve the error. However, before proceeding with the solutions, investigate the probable causes of the error.
What Causes Error 0x80080005 on Windows 10/11?
- Conflict With A Third-Party Antivirus
Well, The antivirus program installed on the system may interfere with the update process and stop it from installing, resulting in the error.
- Unstable Or Poor Internet Connectivity
Well, if your internet connection is poor or not functioning correctly, the update process will be halted, and you will most likely get an error message.
- Corruption Of Windows Update Components
If the Windows update components become corrupted, the update will not install and display an error; thus, resetting the Windows update components may work for you.
- Corrupted System Files
System files are required for the update to be installed correctly. However, if any update files become corrupted, the installation process will fail, and an error message will appear.
How Do I Fix Windows 10 Update Error 0x80080005?
So, these are some of the most typical causes of the update error 0x80080005 on Windows 10 and 11. Well, follow the on-screen instructions to fix the error and install the update.
1. Disable Third-Party Antivirus Software
Most antivirus programs work flawlessly on computers. However, when it comes to updating Windows, users run several challenges. Because it inhibits users from downloading certain update files and, on occasion, corrupts or deletes update files.
If you’re experiencing the Windows 10 update error 0x80080005, it might be due to the third-party antivirus software installed on your computer. In this case, disable some of the antivirus’s functionality or turn off the antivirus entirely. If this does not work, you should remove the antivirus software and replace it with another third-party antivirus program. Also Check : Windows 11 Media Creation Tool.
2. Run The Windows Update Troubleshooter
Minor issues in your system might sometimes prevent you from downloading the most recent updates. So, if you’re facing the error code 0x80080005 on your Windows 10 PC, you may use the troubleshooter included in Windows. You must follow the following steps to do this:
1 – Press the Windows + I key to open the Windows Settings.
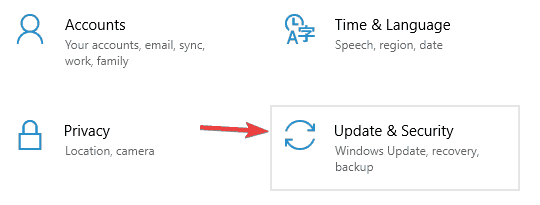
2 – In Windows Settings, choose Update & Security.
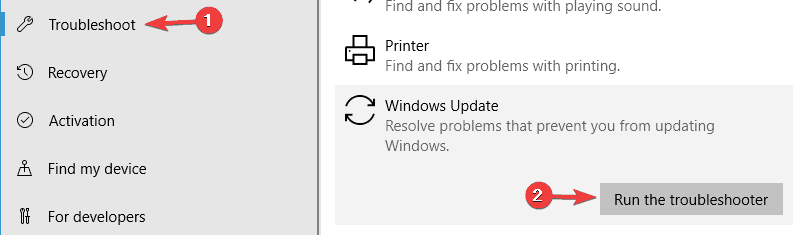
3 – Then, on the left side of the window, click Troubleshoot.
4 – Navigate to the Windows Update section and click the Run troubleshooter button.

5 – The troubleshooter will scan for and discover the problem before automatically resolving it.
Once the troubleshooting is complete, check for the error and try to update Windows again.
3. Repair Corrupted System Files
As previously stated, corrupted Windows system files also conflict with updated components and block them from installing. As a result, it is suggested to use the built-in System File Checker command to repair the corrupted system files. To do so, follow the steps below.
1 – Press Windows + X and choose PowerShell with admin from the list.
2 – Now, on the command prompt, enter sfc/scannow.
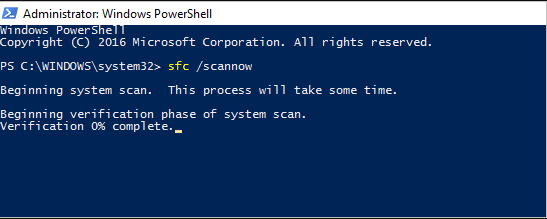
3 – Now, wait for the scanning to finish (minimum 15 min.)
And then restart your computer to verify if the error has been resolved.
If the error persists, repair the DISM scan, which is more powerful and capable of running corrupted system files.
Run DISM Scan
1 – Relaunch Powershell as admin, and on the command prompt, type the following command and press Enter.
DISM /Online /Cleanup-Image /RestoreHealth
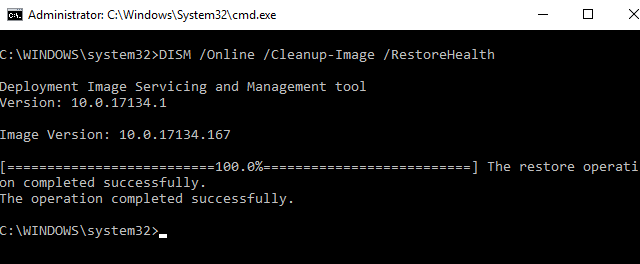
2 – Now, wait for the scanning process to finish (30 min.)
Reboot your system and see if you can update Windows without getting the error 0x80080005; otherwise, check the next remedy. Also Check : Password Protect a Folder.
4. Control The System Volume Information Folder Completely
Many users report that the error 0x80080005 happens when Windows cannot access the System Volume Information folder for any reason. Well, if this is the case for you, follow these simple steps to fix it:
1 – First, open the Command Prompt with admin privilege. To do so, press Windows + X and then choose Command Prompt (admin).
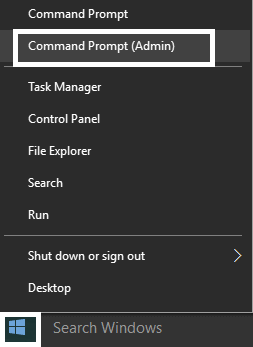
2 – Type the following command into the Command Prompt and press the Enter key to run it:
cmd.exe /c takeown /f”C:\\System Volume Information\\*” /R /D Y && icacls “C:\\System Volume Information\\*” /grant:R SYSTEM:F /T /C /L

3 – Finally, reboot your PC/Computer.
With this command, you may regain full control of the System Volume Information folder, and the Windows update issue will be resolved.
5. Disable The Windows Update Service
Some people suggested that the Windows Update service prevents the update from installing and producing the error. Therefore, disabling the Windows Update service may work for you in this circumstance. To do so, follow the steps below.
1 – Press the Win + R keys together, then type services.msc into the Run box that opens and presses OK.

2 – Next, locate the Windows Update service in the Services window, double-click it, and then select Properties.
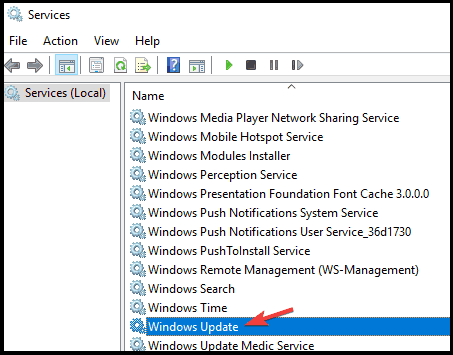
3 – When the Services window appears, identify and double-click the Windows Update service to open its properties.
4 – Next, click on the Startup type and choose Disabled, then click Apply and Ok.
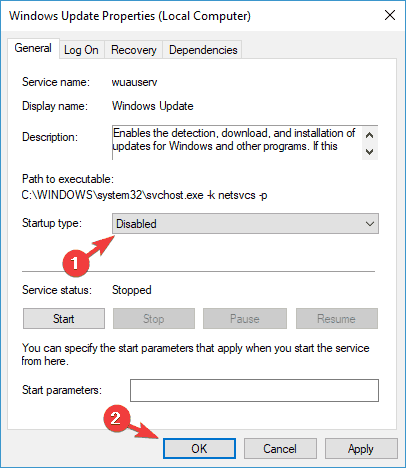
5 – Reboot your Windows PC.
6 – When the system boots up, go to the Services window, open the Windows Update service properties, set the Startup Type to Automatic, and start the service.
6. Reset Windows Update Components
If you have an issue with the Windows Update components, you are significantly more likely to encounter the update error 0x80080005. As a result, to fix the issue, you must manually reset the Windows Update components.
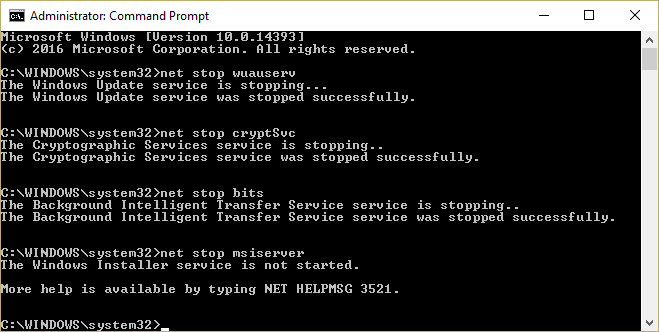
1 – Press Windows + X, then select Command Prompt (Admin).

2 – In the Command Prompt, type the following commands one at a time, pressing the Enter key after each one:
net stop bits
net stop wuauserv
net stop appidsvc
net stop cryptsvc
3 – Now you must delete the qmgr*.dat files; to do so, open the Command Prompt once more and execute the following command:
Del “%ALLUSERSPROFILE%\Application Data\Microsoft\Network\Downloader\qmgr*.dat”
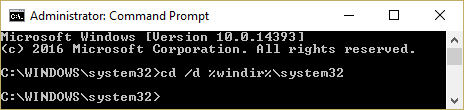
4 – Run the following command into the command prompt once more:
cd /d %windir%\system32
5 – After that, you must reregister the BITS files as well as the required Windows Update files. To accomplish this, run the following commands one by one, pressing the Enter key after each one:
regsvr32.exe atl.dll
regsvr32.exe urlmon.dll
regsvr32.exe mshtml.dll
regsvr32.exe shdocvw.dll
regsvr32.exe browseui.dll
regsvr32.exe jscript.dll
regsvr32.exe vbscript.dll
regsvr32.exe scrrun.dll
regsvr32.exe msxml.dll
regsvr32.exe msxml3.dll
regsvr32.exe msxml6.dll
regsvr32.exe actxprxy.dll
regsvr32.exe softpub.dll
regsvr32.exe wintrust.dll
regsvr32.exe dssenh.dll
regsvr32.exe rsaenh.dll
regsvr32.exe gpkcsp.dll
regsvr32.exe sccbase.dll
regsvr32.exe slbcsp.dll
regsvr32.exe cryptdlg.dll
regsvr32.exe oleaut32.dll
regsvr32.exe ole32.dll
regsvr32.exe shell32.dll
regsvr32.exe initpki.dll
regsvr32.exe wuapi.dll
regsvr32.exe wuaueng.dll
regsvr32.exe wuaueng1.dll
regsvr32.exe wucltui.dll
regsvr32.exe wups.dll
regsvr32.exe wups2.dll
regsvr32.exe wuweb.dll
regsvr32.exe qmgr.dll
regsvr32.exe qmgrprxy.dll
regsvr32.exe wucltux.dll
regsvr32.exe muweb.dll
regsvr32.exe wuwebv.dll
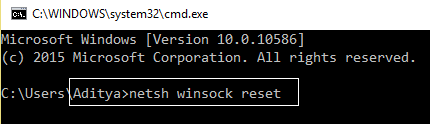
6 – Now, you must reset the Winsock. Well, to do so, open the Command Prompt and type and run the following command:
netsh winsock reset
7 – To reset the BITS and Windows Update services to their default security descriptors, execute the following commands sequentially:
sc.exe sdset bits D:(A;;CCLCSWRPWPDTLOCRRC;;;SY)(A;;CCDCLCSWRPWPDTLOCRSDRCWDWO;;;BA)(A;;CCLCSWLOCRRC;;;AU)(A;;CCLCSWRPWPDTLOCRRC;;;PU)
sc.exe sdset wuauserv D:(A;;CCLCSWRPWPDTLOCRRC;;;SY)(A;;CCDCLCSWRPWPDTLOCRSDRCWDWO;;;BA)(A;;CCLCSWLOCRRC;;;AU)(A;;CCLCSWRPWPDTLOCRRC;;;PU)
8 – Finally, start the Windows update services:
net start bits
net start wuauserv
net start appidsvc
net start cryptsvc
Following the error of all of these commands, all the necessary components for the Windows update will be restarted, and you will no longer see any errors.
7. Start BITS Again (Background Intelligent Transfer Service)
Windows Update relies on the Background Intelligent Transfer Service (BITS) to download updates. Therefore, if the BITS is disabled or not running in the background of your system, Windows will be unable to automatically download updates, resulting in the update error code 0x80080005. Well, if this is the case for you, you should restart the BITS on your system by following these steps:
1 – In the Run dialogue box, press Windows + R and type Control, then click the OK button.
2 – Go to the Category tab in the Control Panel and choose Small Icons.
3 – Navigate to Administrative Tools.
4 – Go to Services and click for Background Intelligent Transfer Service in the list.
5 – Once you’ve located the BITS, right-click on it and select Properties.
6 – Select Automatic (delayed start) as the Startup type from the General tab. After that, click the Start button to run the service.
7 – Finally, click on the OK button.
8 – If the service fails to execute effectively, you can return to the general services option, which displays a list of additional services.
9 – Open the Windows event log and its properties now. Then, return to the BITS and click the start option after changing the startup type to Automatic.
Many users have fixed that by changing the BITS Startup Type to Automatic resolved the error code 0x80080005. Also Check : WiFi Network.
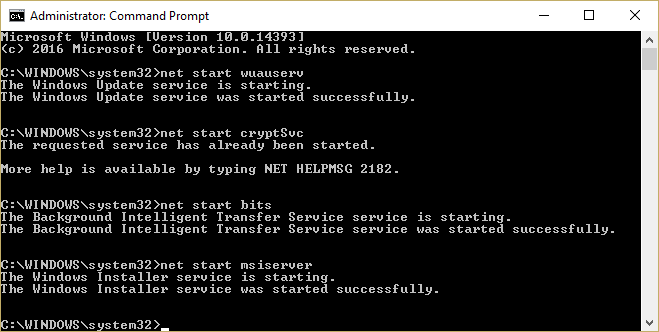
8. Manually Reset BITS Service Security Descriptors
Another notable successful option for resetting the Windows update error code 0x80080005 is to fix the BITS service’s security descriptors manually. Follow these steps to do this:
1 – As stated in the preceding method, open the Command Prompt with admin privilege.
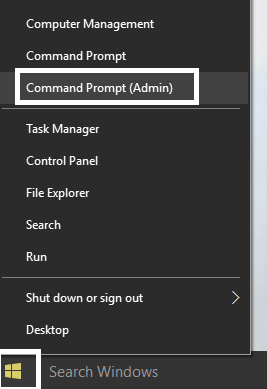
2 – After opening the Command Prompt, run the below commands one by one. To execute them, press the Enter key after each of the commands.
net stop wuauserv
net stop cryptSvc
net stop bits
net stop msiserver
ren C:\Windows\SoftwareDistribution SoftwareDistribution.old
ren C:\Windows\System32\catroot2 catroot2.old
net start wuauserv
net start cryptSvc
net start bits
net start msiserver
pause
3 – Finally, reboot your PC and check for the error.
9. Using Gpedit.Msc, Enable Some Settings
To fix the Windows update error, you may need to enable some settings in the group editor and make some modifications in the group editor. You must perform the following to do this:
1 – To open the Run box, simultaneously press the window + R keys.
2 – Type gpedit.msc into the Run box and press the Enter key.
3 – This will open a new window. Navigate to the following route now:
Computer Configuration > Policies > Administrative Templates: Policy > System
4 – In the System, navigate to the right pane and look for the Specify settings for optional component installation and component repair.
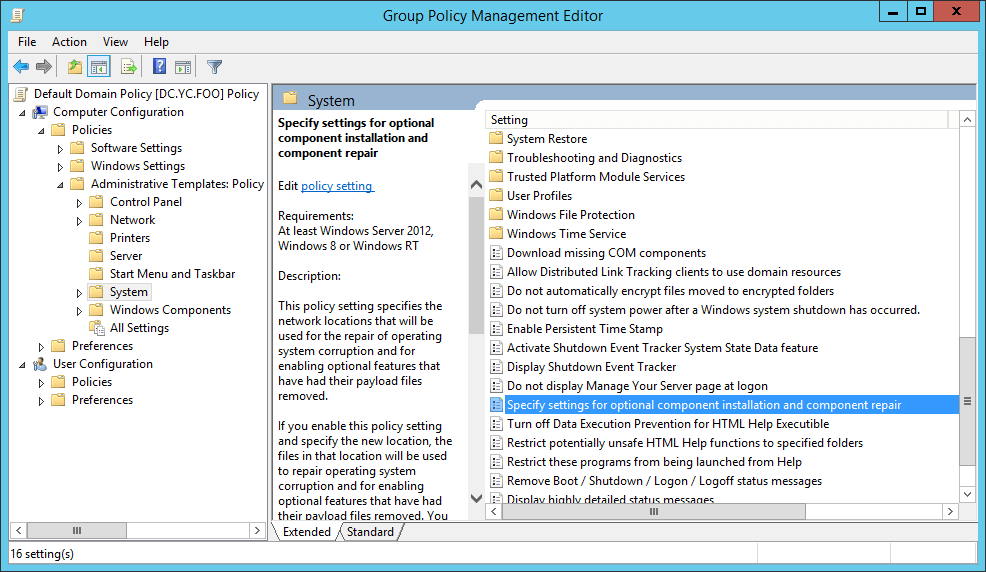
5 – Double-click it to open a new window. Ensure that the Enabled and ‘Contact Windows Update directly’ checkboxes are checked.
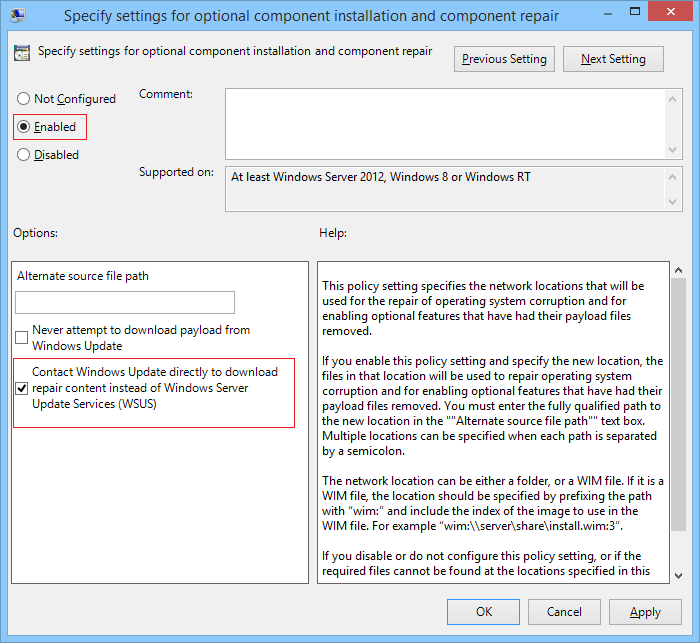
6 – To save all changes, click the Apply and OK button.
10. Use The Media Creation Tool
Well, if none of those mentioned above solutions work to fix the Windows update error 0x80080005, it is suggested that you conduct a clean install by storing all files, settings, and apps using the Media Creation tool. When the installation is complete, you will have the most recent version of Windows installed, and the problem should be resolved.
1 – To begin, download the Media Creation Tool.
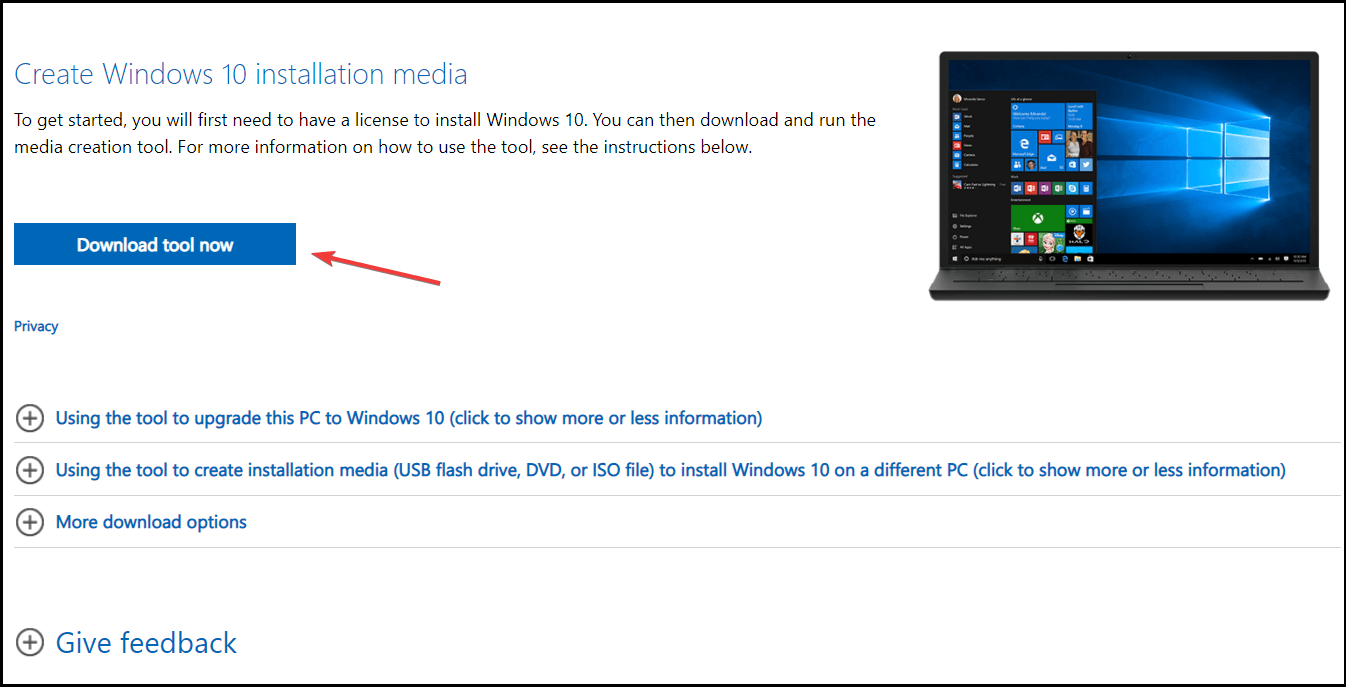
2 – After downloading Windows 10, you must accept the licensing agreement.
3 – Run the tool and select the option Upgrade this PC now.
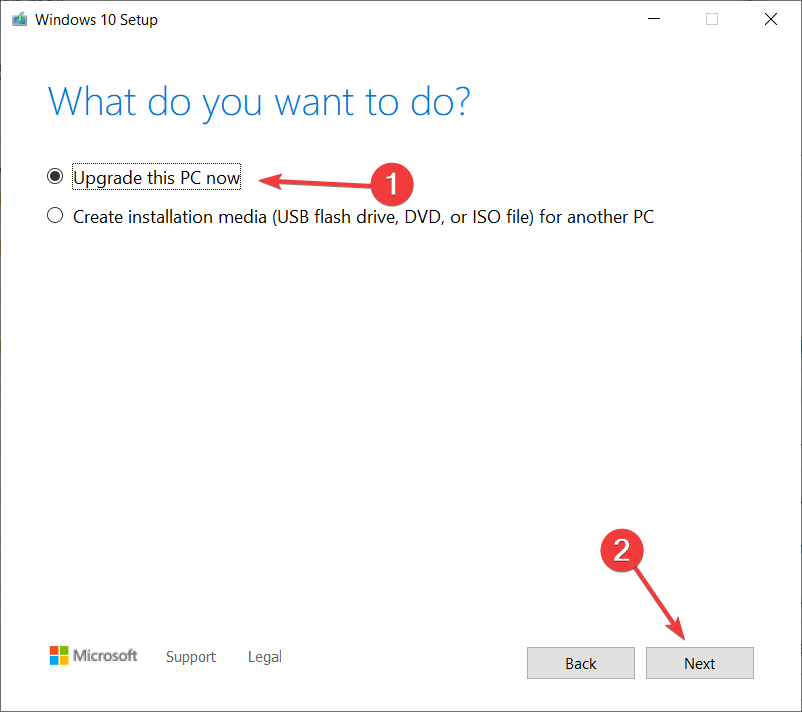
4 – Wait for the update to download all of the necessary files.
5 – Follow the on-screen steps until you reach the Ready to install screen.
6 – Click Change what to keep and select the option Keep personal files and apps.
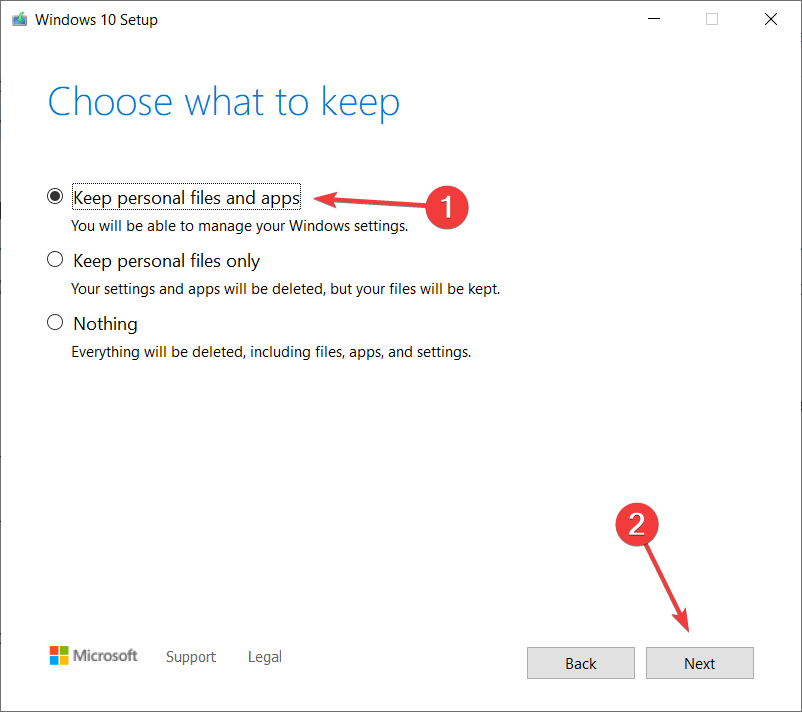
7 – When you click Next, the installation process will begin; follow the directions that appear on the screen to finish the process.
I hope the Windows 10 update error 0x80080005 has been fixed.
The Bottom Line of 0x80080005:
In this article, I have discussed the Windows 10 update error 0x80080005, its causes, and solutions. These solutions may be used to resolve the error 0x80080005 on your Windows 10 PC and begin the update process without more complications.
I hope you enjoyed this article and found these solutions useful. If so, please share this article with others experiencing the same issue. Above that, if you have further questions about the ones mentioned here, don’t hesitate to contact us.